Sketches:


Processing Sketch:

Sketches:
Processing Sketch:
GROUP
Sejo Vega-Cebrián
Anne-Michelle Gallero
………
IDEA
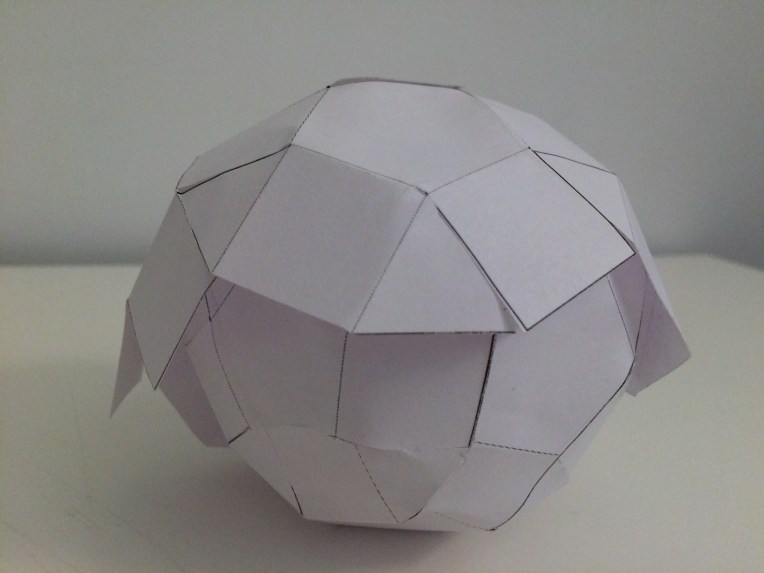
Inspired by the shape of a Rhombicosidodecahedron, we were thinking of making a turtle-box / box-turtle of paper and planned on reverse-engineering it to make half of it as the shell of a turtle. The bottom part with be a smaller shape, so the shell can cover it and work as a lid.
………
INSPIRATION

………
SKETCH

………
PROTOTYPES


NAMES FROM 1887
Description: A running list of girl and boy names from 1887. The number afterwards indicates the occurrence of a name in the US’s Social Security records for that year.

Celestia, 892
— Names from 1887 (@girlboyname1887) February 8, 2017
Bert, 237
— Names from 1887 (@girlboyname1887) February 8, 2017
Bama, 159
— Names from 1887 (@girlboyname1887) February 8, 2017

In exploring the role of chance in the DADA movement, I focused on Kurt Schwitters’s collages: Revolving (1919) Blauer Vogel (1922) and his home Merzbau. Schwitters was best known for coining the name Merz which came from the German word Kommerz (commerce), a word he found by chance while creating a collage. As a response to the aftermaths of World War I, which ended in 1918, Schwitters said, “In the war, things were in terrible turmoil. What I had learned at the academy was of no use to me and the useful new ideas were still unready…. Everything had broken down and new things had to be made out of the fragments.” His collages were abstractions to make sense of the world around him. Throughout his life, he was constantly picking up the fragments of broken pieces and rebuilding as evident in his home, Merzbau. The original site of Merzbau in Hancover, Germany was destroyed in a Alied bomb raid during WWII, but he rebuilds version of the Merzbau at different locations of where he lived in exile during the war.


DRAWING SUBJECT: Kid’s Digital Alarm Clock
For this homework assignment, we continued with our 2D drawing exercise to take an object at home and draw them into slices.
*OBJECT


*SKETCHES


For this week’s homework, we needed to make 5 experimental twitter bots. I tried a few different routes with my Twitter bots with both text, lists and emojis.
My 80s Self
Gathered together lists from Google searches of 80s fashion, pop icons, movies, songs, toys and unique food of the moment to see how they would randomly come together to form your 80’s self in this alternative universe.
(source)
Right now, me and Michael J. Fox are dancing at a pizza party. The bomb!
— My 80’s Self . . . (@My80sSelf) February 1, 2017
Right now, me and Jareth, the Goblin King are biking at a football game. Bite Me!
— My 80’s Self . . . (@My80sSelf) February 1, 2017
Today’s outfit: legwarmers, a dot matrix paper and playing out of the house to New Kids on the Block’s You Got It (The Right Stuff).
— My 80’s Self . . . (@My80sSelf) February 1, 2017
What’s for dinner: Cool Ranch Doritos and Nightmare on Elm Street with a Stud. Wax on, wax off!
— My 80’s Self . . . (@My80sSelf) February 1, 2017
. . . . . .
Mindful.Positive.Thought
I was inspired by this DO THINGS BOT as a reminder to do little things that we take for granted. This “Mindful.Positive.Thought” bot attempts to give little pauses from our screen and stresses of everyday.
(source)
? RESOLVE ?
— mindful thought (@is_positive) February 1, 2017
? LET GO OF ANGER ?
— mindful thought (@is_positive) February 1, 2017
? PATIENCE ?
— mindful thought (@is_positive) February 1, 2017
? CHOCOLATE ?
— mindful thought (@is_positive) February 1, 2017
? STOP ?
— mindful thought (@is_positive) February 1, 2017
? BREATHE ?
— mindful thought (@is_positive) February 1, 2017
. . . . . .
Bad Love Poem
My attempt at poem making using emojis and text. Need to work on my rhymes a lot. Was really inspired to draw with emojis after seeing all the Tiny Gallery bots.
(source)
❤️❤️❤️❤️❤️❤️ Roses are red
❤️❤️❤️❤️❤️❤️❤️ Violets are Blue
❤️❤️? ❤️ ?❤️ ❤️❤️❤️
❤️❤️❤️ ? ? ? ❤️❤️❤️
❤️❤️ Jet is read
❤️ and so are you!❤️— bad.love.poem (@badlovepoem) February 1, 2017
. . . . . .
Black White Pattern
With this bot, I wanted to see if I could generate patterns with simple shapes and colors or see the randomness of shapes visually.
(source)
⚫️ ⬜️ ⚫️ ⬛️ ⬜️
⬛️ ⬛️ ? ⚪️ ⬛️
⚪️ ⬛️ ? ⬛️ ⚫️
⚫️ ? ⬛️ ⬜️ ⬛️— black.white.pattern (@blkwhtpattern) February 1, 2017
. . . . . .
Doc Rhyme Bot
With the idea of children’s book, like Dr. Seuss and Bob Staake books in mind, I wanted to experiment with words and rhymes. The is still a work in progress but the beginning of something to build and play on.
(source)
sit in zing
sting in bit— docrhymebot (@docrhymebot) February 1, 2017
FINAL PROJECT: The Protest Time Machine
For our final PCOM project, we continued on with the concept of a protest time machine to curate the political/protest songs from the 1960s to current day to help remind us what people have and still are fighting for. In last week’s play testing, we needed to make some big adjustments to the project. Since our original idea was to use the Bare Conductive paint, the buttons didn’t always work and we needed to add more programming and hardware elements to the project. We ended up substituting the paint and touch board for an Arduino Mega board with 20 buttons to help create a durable and reliable interface. We laser-cut silhouettes of the ‘protester figures’ with black acrylic sheets to fasten over the buttons in order to keep our original design. And since we wanted the buttons to not only trigger the music but the video/animation connected to the songs, my group partner, Ariana figured out the schematics and wiring of the breadboards, while using a visual patch wiring program, called Max to help connect the audio and visuals that would later be projected on our canvas of protesters.
CONTENT:
The buttons on our piece were assigned one of twenty songs. We tried to balance the amount of songs within each decade to show the history of protest music, which ranges from anti-war protest to equal rights to curfews on the Sunset Strip. It was interesting to see the progression of James Brown’s Say It Loud song and how he influenced Public Enemy and Kendrick Lamar’s songs about the same issue decades later. And every time we start researching for content, there were just more songs to add to the list and then narrow down. I was also trying to figure out how to visually show the relationship between the songs and came across Mariona Ortiz‘s impressive infographics on 1990s songs as inspiration.


CODE:

BOARD VIEW:
On the final version, the buttons were separated into 4 long breadboards to accommodate a larger sized button.


VIDEO DEMO:
REFFLECTION:
After hearing the feedback from our final presentation in our last class, I know that there are things to improve upon for this project. First, I would recommend to anyone taking PCOM to take a fabrication class with this class. I was scared of “the shop” and it was not on the top of my list of classes to take, but for all these midterm and final projects, using laser cutters and knowing how to use the tools just adds that polished touch to these PCOM projects. During my first PCOM class, I said that my tool of choice was an X-acto blade and now I have this newfound appreciation of constructing physical objects with something other than paper, especially after being inspired by all my fellow classmates’ projects. Thinking of fabrication also goes hand-in-hand with what buttons and sensors to use and where to place them. I’m scheduled to take the Piecing It Together class next semester and will hopefully get to work on a plinko-like clock idea that I came to mind when thinking of PCOM final project ideas. If I were to continue on this project and learning from the hiccups of building the initial interfaces of this time machine, the things to improve from the first prototypes are: constructing a sturdier and neater interface eliminating the split of the 2 boards in the middle; using more compact solderable breadboards; and using spacers or a frame to hold/hide all the wires and micro-controller together. In terms of the design, we tested the projector on the canvas after I made the animations, and noticed after the fact that my text was too low and cutting into the bottom silhouettes of the protesters making the lyrics unreadable. I would redesign the animations so the text stays in the upper top of the screen, just above the protesters’ heads.
Another improvement for this project would be creating more instant gratification when a button is pressed. We first had a whole song playing whenever a button was pressed which probably got boring if you weren’t into the song, but most users wants quick responses especially when they are running through all the buttons quickly. I tried to shorten the songs when I was making the animations, but after watching people interact with the latest version of the interface, I see that the clips need to be even shorter. A solution to this would be to add a toggle switch to create a few different modes of listening, (example: Mode #1: Short chorus of the song to make a beatbox-like instrument with all the buttons; Mode #2: Whole chorus with accompanying video/animation projection; Mode #3: Listen to the whole song). I also like the idea, which was a response from our final presentation, of making the interface more practical by being able to press two buttons at once, have the videos branch out of each ‘protester’ button to create a side by side video experience, so the user could compare and contrast the video/animation of the chosen songs, especially if the user is comparing videos representing different eras of history.
My professor, Tom Igoe’s suggestion to develop the story first and figure out the medium within which to tell a story later is something that I’ll always think of when starting a project. We were struggling at first to pick a project that we were both happy with, but we knew we wanted to work with projection mapping and videos. In this project of presenting protest songs as a timeline, the idea was initially to create an interactive TV set or something physical like that to tell the story, but it morphed into the conductive paint then into this projection canvas with graphic physical buttons. Because of the subject matter, I did end up spending too much time on gathering the content and building these videos for each song (while improving my Adobe Premiere skills), and less time concentrating on the sensors and interaction aspect. Next time, I would try to take a more balanced approach or tackle a less complex subject matter for an assignment like this.
CREDITS:
Protester Silhouettes were purchased from iStock by Getty Images; Matte Black and White Acrylics Sheets from Canal Plastic Center; All songs were purchased on iTunes.
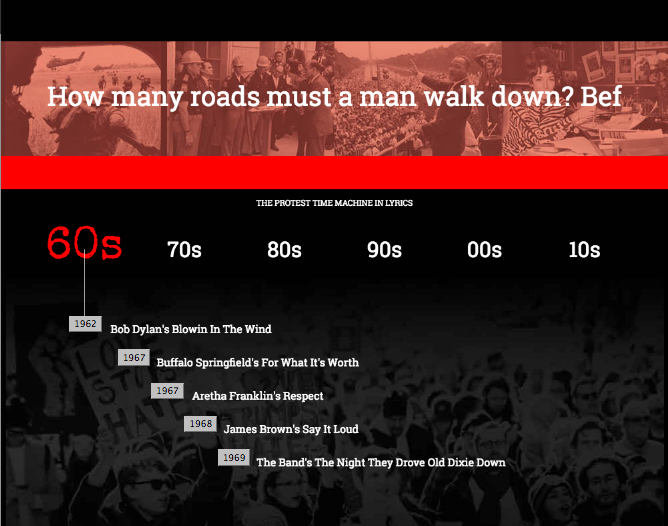
TITLE:
The Protest Time Machine
DESCRIPTION:
A timeline of selected protest and political songs from the 1960s to present time to remind ourselves of what people have been fighting for then and now. Music brings people together and this small collection of songs are examples of the frustration and disappointment in an event and is a call to bring awareness and challenge in a creative and constructive way.
PROCESS:
1) Inspiration: The concept for this project was inspired by a couple of things. First, the results of the 2016 election were surprising and disappointing to many with anti-Trump marches going on across the country to the protests of the Dakota Access oil pipeline. I also was inspired by what was going on in my part-time job. I’m currently designing a Rock N’ Roll bookazine and after reading the chapter on protest and political songs, I wanted explore this content further and to try to create a p5 sketch that could be an extension of the print form, where you would be able to listen to these songs in one place as you read along.
2) Data Collecting: To help me collect all the content, links to YouTube video links, wikipedia description, songs, I kept track of everything in the this excel document below.
3) Design and Coding: I found it helpful to throw all the elements into a Indesign layout program to figure out my design and how to organize the content. It became my blueprint for when I started coding and also held all the data together, so I could copy and paste data quickly.


4) Next Steps: There is so much more that I want to do with this that I didn’t get to, but I’m very happy to have a base that I can build on. The main thing that I would like to do is to make the design less static and more interactive by highlighting photos, videos and caption description from that particular moment in history. While researching and collecting these songs, I not only learned more about the history of that time period, but discovered all these side stories behind the songs and I want to focus on that part of the sketch next. I also used this concept of the protest time machine for my PCOM project, but kept the projects separate because there so much of coding that I still do not have a good grasp on and this project was a good exercise on implementing what we have been learning or are still trying to grasp. But from the feedback of my PCOM project, I saw the need to compare and contrast songs from a certain year or particular cause, like comparing the songs from the Civil Rights era to what is going on with Black Lives Matters decades later and would like to figure out how to code functions like that. And I need to fix small things like having the text scrolling to be in sync with the song playing and to make the play buttons more visual, along with improving the functionality. Lots to learn (and revisit) over the break till the next semester starts again.
CODE
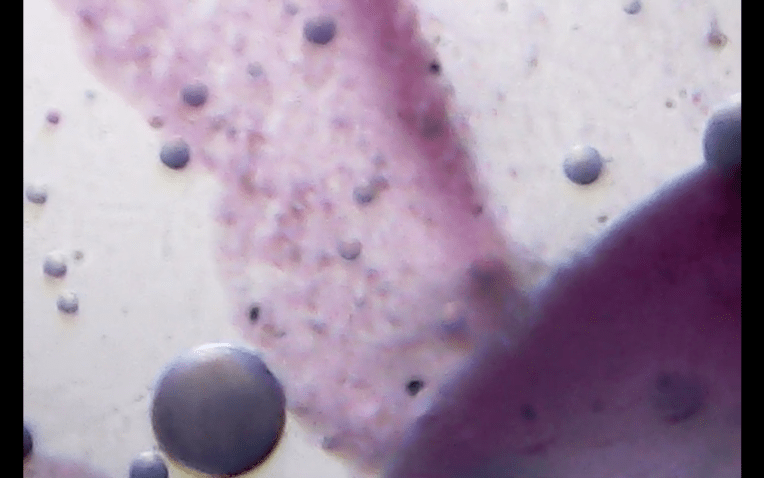
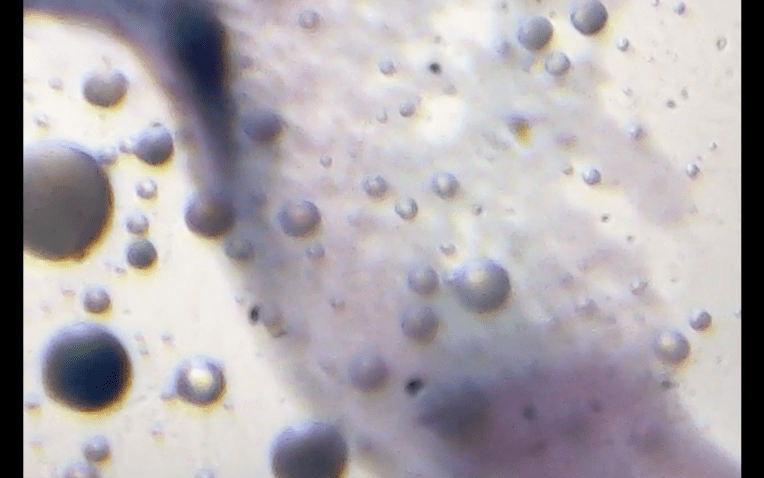
For my Digital Imaging final project, our professor, Eric Rosenthal gave us a webcam to strip down and make into a camera or any device that uses the webcam to capture an image. I decided to turn my webcam into a microscope after finding this idea on the web. I was able to invert the lens inside the webcam to create a macro view and was inspired by Thomas Blanchard’s work with oil, colored acrylics, dish-washing soap and milk to create the images to focus in on. Below are some images that I was able to capture with the reconstructed webcam:


MATERIALS
Webcam
Extra-Bright 9-LED Anywhere Light
Clear Box with Brushed Nickel Lid
Movable USB Light
Milk
Oil
Dish-washing soap
Colored Acrylics
Plastic Petri Dish
Helping Hands Soldering Aid


SETUP
1. ) To take apart the webcam and create a camera with a macro viewpoint, detach the camera sensor from the case and then invert the lens. Using electric tape, attach the upside down lens on top of the camera sensor board.


2. ) Attach the sensor to the ‘helping hands’ clips and create an illuminated stand with the LED light inside a clear acrylic box. To find the right distance between the lens and the subject to focus, I used a piece of paper from a magazine to zoom in on the CMYK dots. I also connected the USB camera to the Photo Booth program on a MAC to view the image on the computer monitor.


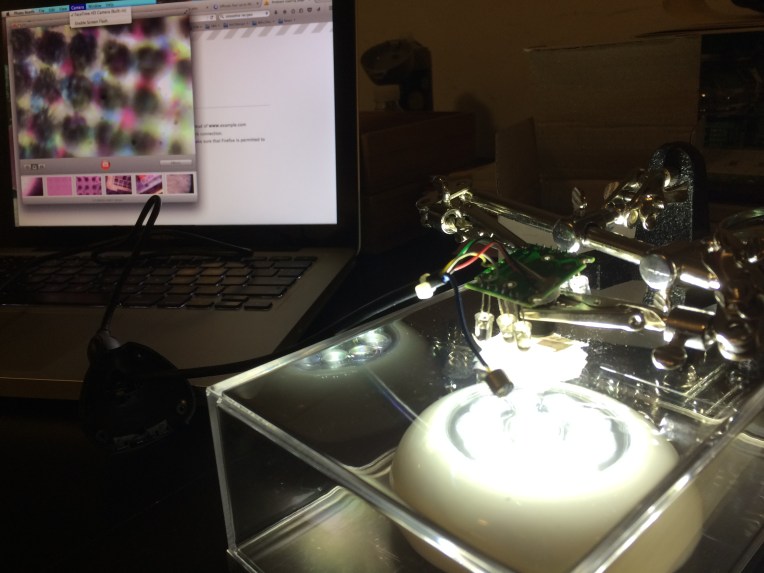
3. ) Mixed a concoction of milk, oil, dish-washing soap and colored acrylics (red and blue in this case) in a petri dish to create the images to photograph up close.


VIDEO
After play-testing Pedro’s Map we received lots of feedback and interesting ideas to improve the game, like adding psychological factors to the story, controlling our character with movable magnetic pieces instead of using hand gestures and for a reward at the end, getting a combination to open a real briefcase with a prize or martini. However, Ariana and I soon realized that our hearts weren’t into the project that it was becoming and decided to come up with another idea.
The new concept came from my ICM final project idea to create a Protest Time Machine using a small selection of political/protest songs from the 1960s to today. We were inspired by this conductive ink and projection mapping project to use conductive paint for graphic touch buttons on a large white board, or possibly a wall for a larger scale project, to trigger the song. We also plan on animating the music lyrics mixed in with YouTube music videos, news clips and iconic photos from that moment in history using a projector.
SUPPLIES
Conductive Paint
Conductive Copper Tape
Bare Conductive Touch Board
Arduino Board
Speaker
MP3s for the selection of political/protest songs
White Boards
Projector
Projection Mapping Program, MadMapper
CONCEPT
PROTOTYPE

BUILDING THE PROTOTYPE
1. Loading the songs onto the Bare Conductive Touch Screen Pad: The pad only holds 12 songs which need to be uploaded to the SD card inside the touch pad. For this prototype, we have five songs from the 60s, six from the 70s, and one from the 80s. For the finished project, we will use another touch board for an additional 12 songs to highlight music from the 80s, 90s, 00s, 10s.

2. Building the graphic touch buttons: the graphics for the buttons were built in illustrator and laser-cut to build the stencil for laying down the conductive paint. We made the mistake of using a thick foam core board, which needed to go through the laser cutter a couple of times. For the final version, we plan on using a thinner board or plastic to create a more polished and precise stencil. I also plan on customizing the silhouettes of the protestor button to the profile of the singer of the song triggered, like Bob Dylan for his Blowin In the Wind song or the profile of that particular protester, like a student’s silhouette to represent Crosby, Stills, Nash & Young’s Ohio song about the Kent State incident.

3. Painting with Conductive Paint: We used the stencil to paint the touch buttons, but used too much paint where the outlines and fine details lost it’s shape. Not only are we planning on using a thinner board for the stencil, we need to blot the ink down for a less blotchy application and it will also allow the paint to dry quicker.

4. Connecting the painted touch buttons to the board: We decided to use conductive tape instead of painting the black lines to connect the graphics to the 12 small circles of the Bare Conductive Touch Board.


5. Testing the buttons with the board: It took a couple of tries to get the buttons to work with the board, but it could be the fact that we tested it before the paint fully dried. I saw that some buttons in the beginning of the row were not working even though they were before. When I started troubleshooting, I lifted the board and noticed the ink crossed paths with the other rows. Because if this, I needed to reapply new conductive tape to the first 4 rows to create a more secure and separate connection. I was scared to use water on the board to remove the water soluble paint, so luckily I found this tip to remove the paint from the board: scraping the paint off the board. And we need to always allow the paint enough time to try before testing it with the board.

NEXT STEPS
The next steps is to add more interactivity to the project by creating animations of lyrics and imagery using map projection and connecting the touch board to an arduino. When we shared this idea of using protest/political songs for our project, there are always more suggestions on what songs should be featured. It would be great to give the participants the option to make their suggestions and incorporate it into the project somehow.
You must be logged in to post a comment.